The Transport Agent is configured using the installed Configuration Utility, which can be started through the Start menu. There are three steps to complete:
| 1. | Specify the connection to the Email Signature Manager database. |
| 2. | Configure the various settings for the Transport Agent. |
| 3. | Register the Transport Agent with Exchange Server. |
Note You will need administrative privileges on the server to run the Configuration Utility.
Specifying the Database
The connection to the Email Signature Manager database is configured on the Database tab in the Configuration Utility:
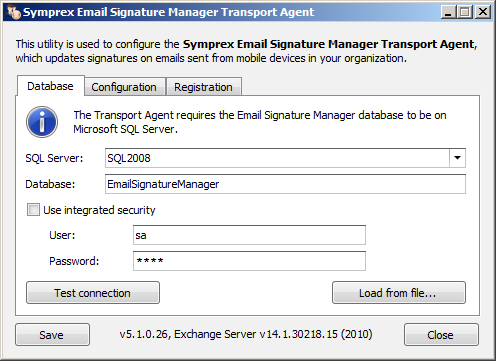
The Transport Agent only supports Microsoft SQL Server. Configure the following settings as required:
| • | Server: Enter the name of the server where the database is located or select it from the drop-down list of available servers. |
| • | Database: Enter the name of the database on the server. |
| • | Use integrated security: Check this option to allow the Transport Agent to connect to the database using integrated Windows security. |
| • | User: When using SQL Security, enter the login to connect to the server. |
| • | Password: When using SQL Security, enter the password for the login. |
Note It is recommended that SQL Server Authentication is used for the Transport Agent; Integrated security is not normally suitable because the Exchange Transport service will be running under a built-in account and hence cannot be configured as a user on SQL Server.
To verify that you have entered the details of the database correctly, click the Test Connection button.
Note that in order to simplify configuration, the settings for connecting to the database can be saved from Email Signature Manager and loaded by clicking the Load from file... button.
When ready, click the Save button to save the settings.
Configure Settings
The following settings can be configured on the Configuration tab:
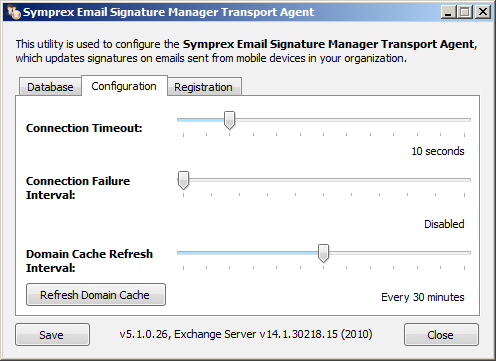
| • | Connection Timeout: Specifies the timeout for connecting to SQL Server when processing an email. It is recommended that this timeout is kept fairly short as connections should be made quickly under normal operating conditions. |
| • | Connection Failure Interval: If connecting to SQL Server fails when processing an email, this interval specifies how long the Transport Agent will wait until trying to connect again. During this interval, any emails processed by the Transport Agent will not have signatures applied. |
| • | Domain Cache Refresh Interval: For efficiency, the Transport Agent maintains a list of the local domains from which emails should be processed; this allows emails to be examined very quickly without the need for a database connection to be established to determine if they needs processing. This interval species how often the cache should be refreshed. If necessary, the cache can be refreshed on demand by clicking the Refresh Domain Cache button. |
When ready, click the Save button to save the settings.
Registering on Exchange Server
In order for the Transport Agent to be called to process email, it must be registered with Exchange Server. This is accomplished by executing the appropriate commands within the Exchange Management Shell.
The Registration page specifies the commands that need to be executed:
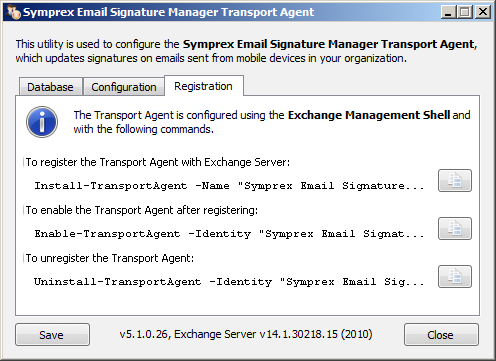
To register the Transport Agent after installation:
| • | Start the Exchange Management Shell. |
| • | Click the copy button next to the Register command and paste it into the Management Shell. Press Enter to execute the command. The Transport Agent is now registered with Exchange Server with the name "Symprex Email Signature Manager Agent". |
| • | Click the copy button next to the Enable command and paste it into the Management Shell. Press Enter to execute the command. The Transport Agent is now enabled and will be called by Exchange Server to process emails. |
| • | Re-start the Microsoft Exchange Transport service. |
Note The Microsoft Exchange Transport service can be restarted either through the Windows Services Control Manager or by executing the following command within the Exchange Management Shell: Restart-Service MSExchangeTransport
To un-register the Transport Agent before uninstalling:
| • | Start the Exchange Management Shell. |
| • | Click the copy button next to the Unregister command and paste it into the Management Shell. Press Enter to execute the command. The Transport Agent is now un-registered with Exchange Server . |
| • | Re-start the Microsoft Exchange Transport service. |
Note If you wish to uninstall the Transport Agent, you may find some files are in use by the system even after restarting the Transport Agent. If this happens, it will be necessary to either reboot the server or restart IIS; this can be accomplished using the iisreset command either in a command prompt or from the Exchange Management Shell.
When ready, click the Close button to close the Configuration Utility.