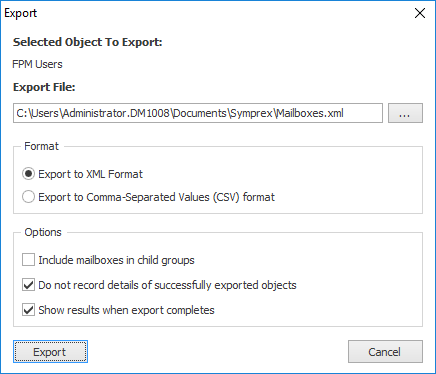
The Export dialog is opened by selecting an address list, distribution list, mailbox or Public Folder in the main application window and clicking the Export button in the Tools group in the Home ribbon:

You can configure the export as follows:
•Export File: Specifies the name of the export file to be generated. A default name will be entered based on the selected object and you will be warned if the file already exists before the export starts.
•Format: Determines the format of the export file, which can be either XML or Comma-Separated Values (CSV) for use in Microsoft Office Excel (and other tools). Notice that changing the export format will automatically change the extension of the export file.
•Include Mailboxes in child groups: Specifies that mailboxes from all child groups within the selected mailbox group will be included in the export. Only used when exporting a mailbox group list.
•Include child Public Folders: Specifies that child Public Folders in the selected Public Folder will be included in the export. Only used when exporting a Public Folder.
•Do not record details of successfully exported objects; On large address lists, it can take a considerable amount of memory to store the results of exporting all objects. In order to reduce the memory required, select this option; this will mean that only objects that were not exported successfully are retained in memory and consequently displayed in the Results dialog.
•Show results when export completes: Specifies the Export Results dialog will be displayed on the export has completed.
Note A mailbox group is a generic term for either a distribution list or an address list.
Note If you check the "Include mailboxes in child groups" option, you should be aware that this can significantly increase the export time, especially when exporting the Global Address List. This is because the export will examine all child groups and ensure that a mailbox is only included once in the export.
When you are ready to continue, click the Export button; the dialog will expand to show progress and can be cancelled if required. Alternatively, click the Cancel button to close the dialog. The permissions export can later be imported to Exchange using the Import dialog.