The Office 365 Integration dialog is opened by clicking the Office 365 Integration... button in the Mobile Device Signatures dialog:
Note An overview of the Signature Injection Service for Office 365 can be found in this topic.
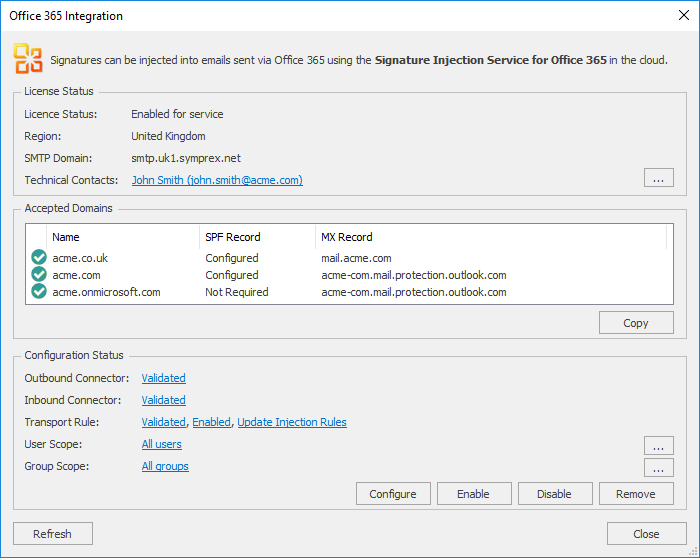
When the dialog is opened, the License Status frame shows if your license is enabled for use with the Signature Injection Service for Office 365. If it is, the same frame also shows the associated region of service, the SMTP domain your emails will be routed through for signature injection, and any technical contacts in your organization you have listed for Symprex to contact in the event of any technical issues with the service. You can manage this list in the Technical Contacts dialog.
If your license is enabled for use with the service, an authentication dialog will appear, requesting credentials of an administrative account, to log on to Exchange Online to query the details of your tenant.
Note If your administrative account is setup for multi-factor authentication (MFA), the Exchange Online Remote PowerShell Module must be installed, more information on which can be found in this topic.
When successfully logged on to your Office 365 tenant, the Accepted Domains and Configuration Status frames show your tenant configuration as described below.
The Accepted Domains frame shows a list of the accepted domains configured in your Office 365 tenant with the following information:
•Name: The accepted domain name.
•SPF Record: The state of the SPF TXT record for the domain, determining if (where required) the record includes spf.symprex.net; see below for more information.
•MX Record: The primary MX record for the domain.
Important Before configuring your Office 365 tenant to integrate with the Signature Injection Service for Office 365, you must configure the SPF record for each of your accepted domains (except the default onmicrosoft.com domain) to include spf.symprex.net by adding include:spf.symprex.net, as shown in this example:
v=spf1 include:spf.protection.outlook.com include:spf.symprex.net -all
Any incorrectly configured domains will be clearly highlighted.
You can use the Copy button to copy the details of your accepted domains to the clipboard, if you would like a copy of this information.
The Configuration Status frame shows the configuration of your Office 365 tenant for use with the Signature Injection Service for Office 365:
•Outbound Connector: The Outbound Connector sends email from your Office 365 tenant to the Symprex cloud for signature injection. The Outbound Connector must be correctly configured and match the settings in your license.
•Inbound Connector: The Inbound Connector receives email back from the Symprex cloud servers after signatures have been injected and continues the delivery process. The Inbound Connector must be correctly configured.
•Transport Rule: The Transport Rule is used to forward email to the Outbound Connector for signature injection. The Transport Rule must be correctly configured and can optionally be scoped to only forward email from specific users and/or groups. The rule is automatically scoped against the Signature Injection Rules defined on the Mobile Device Signatures dialog, so only emails matching those rules are forwarded to the Symprex cloud for signature injection; if the rule is not up to date against the injection rules, click the Update Injection Rules link to update it. The rule is also automatically scoped against the Accepted Domains excluding any "OnMicrosoft.com" domains; if the rule is not up to date against the accepted domains, click the Update Domain Scope link to update it
•User Scope: The User Scope allows you to scope the Transport Rule to only apply to specific users.
•Group Scope: The Group Scope allows you to scope the Transport Rule to only apply to email sent from members of specific groups.
The configuration can be updated using the buttons at the bottom of the frame:
•The Configure button will configure your Office 365 tenant for use with the Signature Injection Service for Office 365, including creating the Outbound Connector, Inbound Connector, and Transport Rule. This option will replace any existing configuration listed but any user, group and domain scope will be preserved.
•The Enable button will enable the Transport Rule, causing email to be forwarded to the Outbound Connector.
•The Disable button will disable the Transport Rule, which will stop email from being forwarded to the Outbound Connector and hence stop all signature injection.
•The Remove button will completely remove the configuration from your Office 365 tenant, which will stop all signature injection.
Note If you prefer to manually configure your Office 365 tenant, you can request a separate configuration document from Symprex, which lists the manual steps as well as PowerShell commands to create, manage and remove the required configuration.
To refresh the dialog, click the Refresh button and when ready, click the Close button to close it.