This topic explains how to create or edit a custom data source for use with your templates.
Create the Data Source
Custom data sources are managed using the Manage Data Sources dialog.
•To create a new data source, click the Add button on the dialog.
•To edit an existing data source, select it from the list on the left side of the dialog.
Configure the Data Source
The first part of the configuration is to specify the database from which the user data will be fetched using the Data Source page:
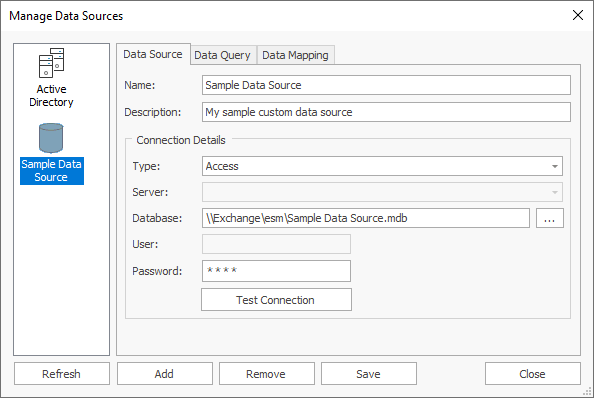
Select the type of the source database in the Type drop-down and then configure the following settings:
•Server: When connecting to Microsoft SQL Server, enter the name of the server where the database is located, or select from the drop-down list of available servers. When connecting to Oracle, specify the name of the server where the database is hosted, using a colon to specify a custom port if required.
•Database: Specifies the actual database from which the data will be imported:
oWhen connecting to a Microsoft Access database, enter the full path to the database or select it by clicking the ellipses ("...") button.
oWhen connecting to a Microsoft SQL Server database, enter the name of the database or select it by clicking the ellipses ("...") button.
oWhen connecting to an Oracle database, enter the name of the database.
•User: When connecting to Microsoft SQL Server using SQL Security or Oracle, enter the login to connect to the server.
•Password: When connecting to either a password-protected Microsoft Access database, Microsoft SQL Server using SQL Security, or Oracle, enter the password.
To verify that you have entered the details of the database correctly, click the Test Connection button; this will open a connection to the database using settings specified (although no data will be read at this point).
Specify the Data Query
The second part of the configuration is to specify the query that will be used to fetch the user data from the database using the Data Query page:
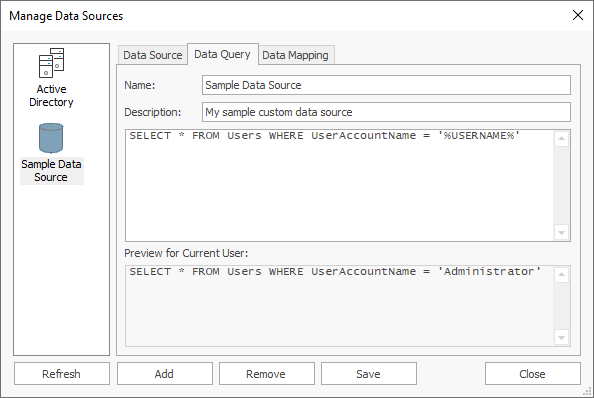
The query needs to be specified such that it will return a single row of data for the user to which a signature is being deployed. To accomplish this, the WHERE clause of the query can be customised using the following tokens:
Field Name |
Description |
%USEREMAIL% |
This token is replaced by the user's Active Directory email address. |
%USERNAME% |
This token is replaced by the user's Active Directory account name. |
%USERDOMAIN% |
This token is replaced by the NETBIOS name for the user's domain. |
%USERDNSDOMAIN% |
This token is replaced by the full DNS name for the user's domain. |
Generally speaking, the source table for the query should contain a primary key that can be mapped to one (or more) of these tokens. In the example above, the UserAccountName field in the database is the primary key field in the table and is used to match against the user's Active Directory account name. The Preview for Current User box is updated from the specified query using the account details for the current user, which can be used to verify that the query is generated as expected.
Specify the Data Mappings
The third part of the configuration is to specify the mappings between the fields returned by the query and the fields in the signature using the Data Mapping page:
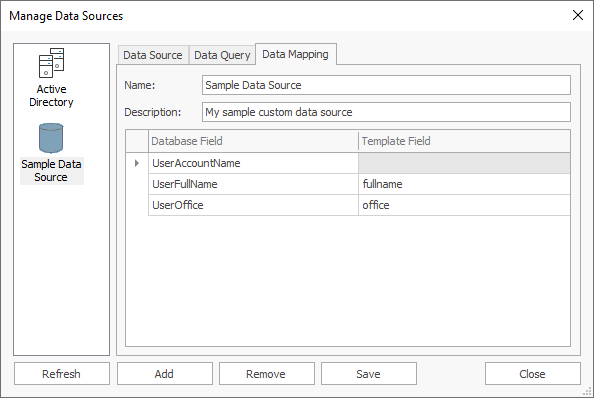
When the Data Mapping page is selected, a connection to the database specified on the Data Source page will be established and the query specified on the Data Query page will be executed to determine the fields available; these fields are displayed in the Database Field column of the grid. For each database field that should be mapped, select the field in the Template Field of the grid.
In the example above:
•The UserFullName database field has been mapped to the fullname template field; when the signature is deployed, any instances of the {fullname} field will be replaced by the value of the UserFullName field from the database.
•The UserOffice database field has been mapped to the office template field; when the signature is deployed, any instances of the {office} field will be replaced by the value of the UserOffice field from the database.
Configuration Completed
The configuration of the data source is now completed; click the Save button to save the changes. You can now select the data source as the source for any signature and verify that it is fetching the correct data for any user by using the Test Signatures dialog.
Note If the query fails to return a record when the signature is generated, the signature will be populated using the data from Active Directory.