The Manage Deployment dialog is opened by clicking the Manage Deployment button in the Deployment group of the Home ribbon on the main application window.
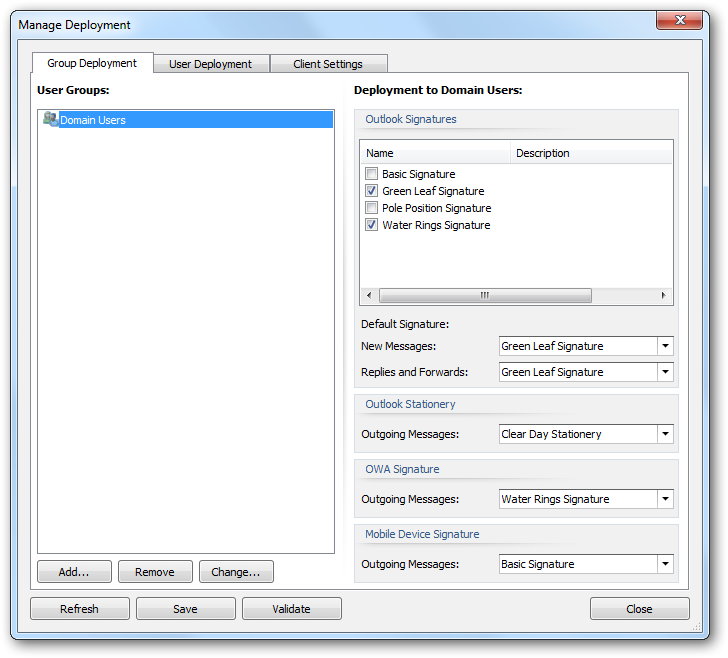
Deployment of signatures to the users in your organization can be configured either by group membership (i.e. users will receive the signatures for the group to which they belong) or individually (i.e. per-user). The Group Deployment page manages the Active Directory groups for which deployment has been configured and the User Deployment page manages the individual Active Directory users for which deployment has been configured.
Important If deployment for a user has been specified both by membership of one or more groups, and individually, then the individual deployment settings will take precedence.
The Group Deployment and User Deployment pages work in an identical manner:
| • | The list of objects (i.e. groups or users, as appropriate to the selected page) is displayed on the left of the page; selecting an object will display the deployment settings on the right of the page. |
| • | To refresh the list of objects, click the Refresh button. |
| • | To add a new object, click the Add... button; you will be presented with a new dialog to select the group or user to be added from Active Directory. |
| • | To remove the selected object, click the Remove button. |
| • | To change the selected object (but preserve the deployment configuration, click the Change... button; you will be presented with a new dialog to select the group or user to replace the selected object. |
| • | To ensure that deployment is valid, click the Validate button; this will start a process that verifies each group and user can be loaded from Active Directory, and updates them as appropriate. If a certain object cannot be found, the icon for that object is updated to show that it is no longer valid; if this happens, either remove the object or replace it with a new object. |
With an object selected, the following options are available to specify how signatures are deployed to that object:
| • | Outlook Signatures: Select the signatures that you wish to be installed to Microsoft Outlook for the group/user. The selected signatures will then be available for the user to choose within Outlook for signing emails. |
| • | Default Signature - New Messages: Select the signature that will be set as the default signature for signing new emails. The default can be set to none by selecting "<None>" or it can be left unchanged by selecting "<Do Not Change>". |
| • | Default Signature - Replies and Forwards: Select the signature that will be set as the default signature for replying and forwarding emails. The default can be set to none by selecting "<None>" or it can be left unchanged by selecting "<Do Not Change>". |
| • | Outlook Stationery - Outgoing Messages: Select the stationery that will be set as the default stationery for outgoing messages. The stationery can be set to none by selecting "<None>" or it can be left unchanged by selecting "<Do Not Change>". |
| • | OWA Signature - Outgoing Messages: Select the signature that will be set as the default signature for outgoing messages authored in OWA (Outlook Web App/Outlook Web Access). The signature can be set to none by selecting "<None>" or it can be left unchanged by selecting "<Do Not Change>". |
| • | Mobile Device Signature - Outgoing Messages: Select the signature that will be set as the default signature for outgoing messages on mobile devices. The signature can be set to none by selecting "<None>" or it can be left unchanged by selecting "<Do Not Change>". |
Note: The Mobile Device Signature specifies the signature that is deployed to the Blackberry Enterprise Server database (if you have configured Blackberry deployment) and the signature that is used by the Transport Agent to inject signatures into emails sent from your users' mobile devices (if you have the Transport Agent configured).
The Client Settings page can be used to configure global client settings.
When the deployment has been configured as required, click the Save button to save your changes. Click the Close button to close the dialog; if you have made any changes, you will be prompted to save before the dialog is closed.