The Access Control dialog is opened by clicking the Options button on the Tools page in the Configuration backstage of the main application window:
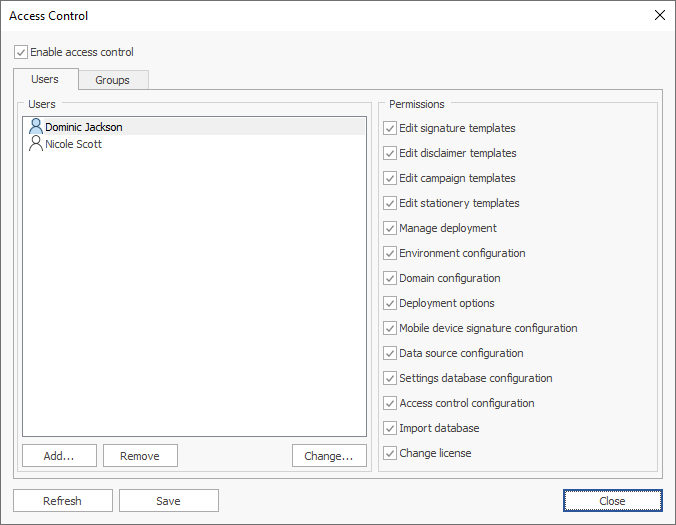
The Access Control dialog is used to specify the permissions that the users in your organization have when using Email Signature Manager. To enable access control, select the Enable access control option at the top of the dialog. If access control is disabled, all users can perform all actions. Once access control is enabled, permissions to use the various functions of the application can be specified either individually per user or by group membership.
Note Users that are members of the Domain Admins group always have full access and can perform all actions.
The permissions applied to a user are calculated in the following order of precedence:
•Permissions granted to an individual user on the Users page.
•Permissions granted through membership of a group specified on the Groups page where a user will take the permissions of the first group of which the user is a member.
•Default permissions.
The default permissions are:
•Start the application and browse templates.
•Open the Status Monitor dialog.
The permissions that can be assigned are:
•Edit signature templates: Allows a user to create or edit a signature template.
•Edit disclaimer templates: Allows a user to create or edit a disclaimer template.
•Edit campaign templates: Allows a user to create or edit a campaign template.
•Edit stationery templates: Allows a user to create or edit a stationery template.
•Manage deployment: Allows a user to open the Manage Deployment dialog.
•Environment configuration: Allows a user to open the Environment Configuration dialog.
•Domain configuration: Allows a user to open the Domain Configuration dialog.
•Deployment options: Allows a user to open the Deployment Options dialog.
•Mobile device signature configuration: Allows a user to open the Mobile Device Signatures dialog.
•Data source configuration: Allows a user to open the Data Sources dialog.
•Settings database configuration: Allows a user to open the Settings Database dialog.
•Access control configuration: Allows a user to open this dialog.
•Import database: Allows a user to open the Import Database dialog.
•Change license: Allows a user to change the application license.
Both the Users and Groups page work in an identical manner. The left side of each page lists the objects to which permissions have been granted. Selecting an object from the list will display the assigned permissions on the right side of the page, and the rights can be assigned as required. To add a new object, click the Add... button. This will open a dialog to allow one or more objects to be selected from the domain. The selected object can be removed by clicking the Remove button or changed to another object, preserving the assigned permissions, clicking the Change... button. In addition, the order of groups can be altered by selecting a group and clicking the up or down arrow to move that group up or down within the list.
To refresh the access control configuration from the database, click the Refresh button.
When the access control has been configured as required, click the Save button to save your changes. Click the Close button to close the dialog; if you have made any changes, you will be prompted to save before the dialog is closed.