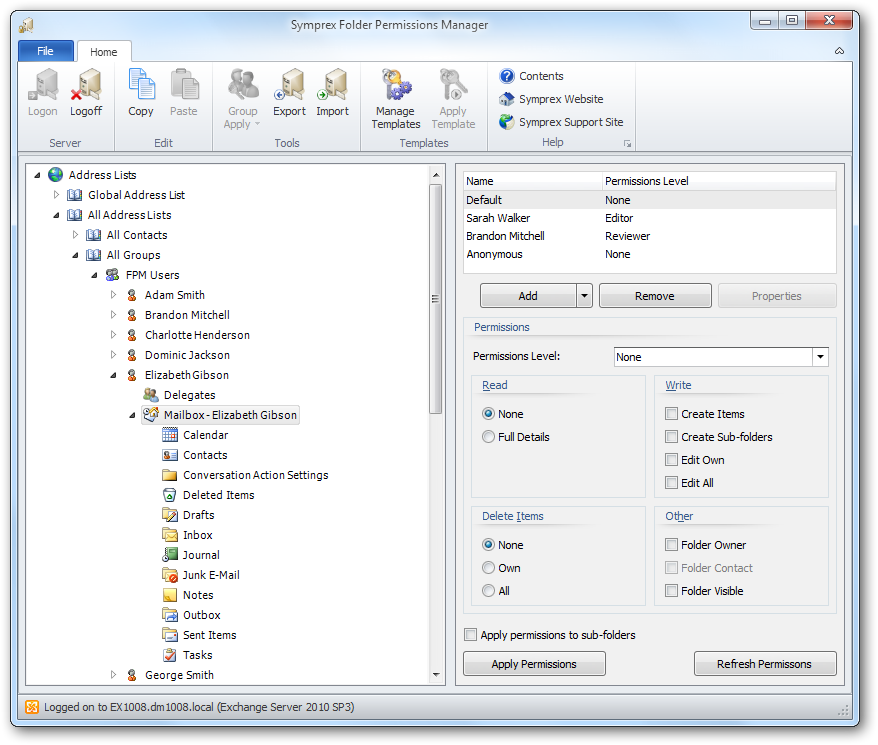
The main application window has several areas, as shown below:

The ribbon at the top of the window provides access to all of the functions in the application. The ribbon can be collapsed to provide more area for the main content of the window by clicking the arrow in the top right-corner. The buttons in the ribbon will be available according to the current selection in the main window. When you are logged on to Exchange, the server to which you are connected is displayed in the status bar at the bottom of the window. Further details and options about the application can be found by clicking the File button, which will display the File page. If you have not logged on to Exchange, click the Logon button in the Server group to display the Logon dialog.
The left-hand side of the window displays a tree of your Exchange system, including all groups (address lists and distribution lists), users (including delegates. mailboxes and sub-folders), and Public Folders. Expanding the nodes (either by double-clicking the node itself or clicking the expansion box to the left of the node) will reveal the contents of that node.
Each user node as two immediate child nodes. The mailbox root node can be selected to display its permissions and expanded to reveal the folders contained within the mailbox. When a mailbox or folder is selected in the tree, the right-hand side of the window displays the permissions for that object. The main list shows the users who have permissions on the selected object, and this may be changed by using the Add and Remove buttons, or you may view the properties of an existing user in the list by clicking the Properties button. Below the list, the permissions that the selected user has are displayed. To change the permissions, either select the pre-defined role from the drop-down list or set custom properties using the appropriate check boxes.
Note Please refer to the Roles and Permissions Appendix for further details about permissions.
By default, the permissions are only applied to the selected object. To apply the permissions to all of child objects, check the Apply permissions to sub-folders option. Notice that this will replace any permissions on all sub-folders of the current object with those currently defined.
Once you are happy with the changes made, click the Apply Permissions button. Alternatively, to restore the original permissions as currently set, click the Refresh Permissions button.
Permissions can be copy-and-pasted between folders, as follows:
| 1. | Select the folder from which you wish to copy permissions |
| 2. | Click the Copy button in the Edit group of the ribbon (all of the permissions will be copied) |
| 3. | Select the folder on which you wish to set the permissions |
| 4. | Click the Paste button in the Edit group of the ribbon (all of the permissions will be replaced with those copied from the original folder) |
| 5. | Click the Apply Permissions button to update the folder. |
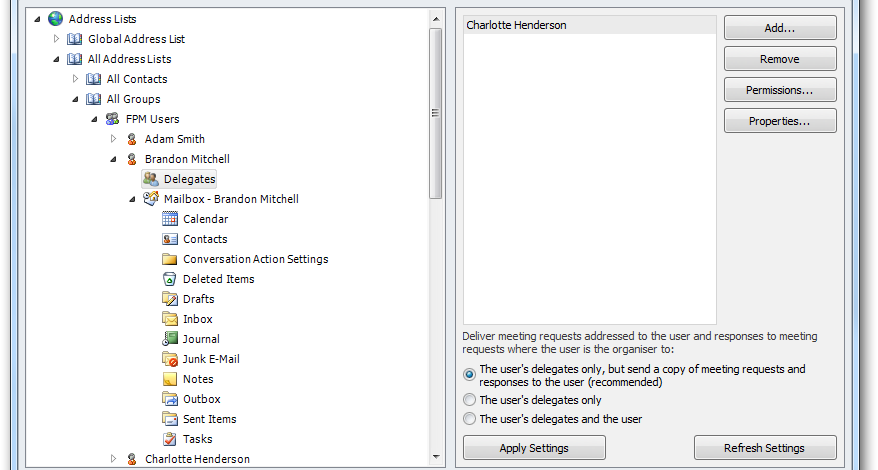
Within a user node, selecting the Delegates node will display the delegates assigned to the user's mailbox on the right-hand side of the window.

Note The Delegates node is only available if the current session was established with delegate management enabled; please refer to the Logon dialog for more details.
The list may be changed by using the Add... and Remove buttons. To view the permissions that will be assigned a delegate, select one or more delegates and click the Permissions... button; this will open the Delegate Permissions dialog. Alternatively, you can view the view the properties of the selected delegate(s) by clicking the Properties button. Below the list, the appropriate option for delivering meetings and responses can be selected. Once you are happy with the changes made, click the Apply Settings button to apply the current delegate settings to the mailbox. Alternatively, to restore the original delegates as currently set, click the Refresh Settings button.
Permissions can be exported to a file by selecting a user, group or Public Folder in the Explorer tree, and clicking the Export button in the Tools group to open the Export dialog, The exported permissions can subsequently be imported by clicking the Import button to open the Import dialog. To apply permissions and/or delegates to a larger number of objects, select the appropriate group or Public Folder in the Explorer tree and click one of the options under the Group Apply button in the Tools group to open the Group Apply Wizard. Permissions and delegates that will be applied on a regular basis can be stored in a template. Click the Manage Templates button in the Templates group to open the Manage Templates dialog. To apply a template, select the appropriare group or Public Folder in the Explorer tree, and click the Apply Template button to open the Apply Template Wizard.